Wednesday, March 14, 2012

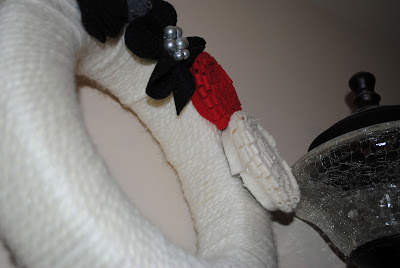
The Finished Wreath

 My sister enjoys a more neutral palette than I do. Rather than force my bright ideas on her, I conformed and made something that would fit her personality. This is the completion of the wreath that I posted last week. I got the idea for these colors from a post that I saw on Tater Tots and Jello.
 I bought all of the felt and yarn at Michael's craft. I bought a gray strand of pearls, that was 50% off. I intended to make more flowers with the pearls, but I didn't want to overload the wreath with flowers.
 I have learned the rule of design as taught to me by my mother, and I always group items in odd numbers. It makes sense to me, sometimes.


Thanks to Miranda for taking the pictures for me. We live 4 hours away from each other, and I don't get down to visit as often as I should. I hope you are enjoying the slight amount of color this brings to your home.

Tuesday, March 13, 2012

Tuesday Tutorial: Quote Board

I have had an obsession with Jane Austen since the 5th grade. I was introduced to the 6 hour version of Pride and Prejudice, and since then I adore her books, and most of the movies based on her novels. I decided that I wanted to make a quote wall in my family room. The first quote that will grace my walls, comes from the beloved Captain Wentworth in Persuasion. I debated about whether or not to use the whole quote, eventually deciding to use just half of it. I can just think of Captain Wentworth right now, " You pierce my soul. I am half agony, half hope...I have loved none but you." So sweet. Why wouldn't it be the firsts quote on my wall? Let's get down to business....

I bought a 10x17 board from The Wood Connection. They have a great selection of different sizes. I will be purchasing the rest of my quote boards there. 
 I painted the top a bright white. I envisioned very crisp and bright letters. White stands out against most colors. 
 Make sure that you get a few layers of white on there. I didn't want any of the knots in the wood to show through, even though I was going to paint over it in a darker color. 
 I used my Silhouette Cameo and designed the letters in the size and font that I wanted. I cut them out, and placed them on transfer paper. The paint was slightly wet when I put them down. It caused me problems because they didn't want to stick down as well as I needed. But in the end I liked the effect of the vinyl pulling off some of the white paint. It gave the quote an aged look. Yay!
 This is what it looked like before I started to paint the turquoise on top. I recommend sponging the paint over the letter at first, as you do the second coat of paint you can brush like normal.  
 Cover the whole board, and let it dry. 
 I didn't get a picture of it, but I lightly brushed white over some spots on the board, just before I peeled the letters off. 
 I used my spatula to help peel off the vinyl. I love the defined edges. 


And there you have it. Thank you Jane Austen for providing us with some the most quotable books and movies. I love love my first quote board. Stay tuned for next addition to the wall later this week.  

Friday, March 9, 2012

Read:to look at carefully so as to understand the meaning of something written

 
One of my favorite pastimes is, you guessed it, reading. I have a good collection, it doesn't all fit on my small bookshelf. In order to celebrate my love of reading, I picked up some letter from The Wood Connection. I had some girly scrapbook paper from a few years ago. I traced the letters and used wood glue to apply the paper. I feel like it pulls the shelf together well and it expresses my fondest desire: to read! 
Posted by Picasa

Thursday, March 8, 2012

Fun with Vinyl

 I decided to try my hand at some vinyl projects tonight. I have always wanted to label all of my kitchen items. I thought they were so cute on other blogs. I couldn't decide on the size, so I tried a couple different sizes.
 It was really easy using my Silhouette Cameo, it lets me choose the size of vinyl I am using and then I can size my project accordingly. then you can utilize little pieces of vinyl you have left over from other projects.
 This was more complex. I ended up tearing some of the small line around the edge. It was so frustrating. I just barely sized my vinyl larger than my board, and it was a nightmare. Lesson learned. You have to be so exact on projects you want to go edge to edge.
Its a good piece waiting for a cool wall to accentuate. I want to make a few more prints, perhaps a chevron board, and some polka dots. I can't wait to get working on them. 

Tuesday, March 6, 2012

Pallet Art

The nice thing about growing up on a farm is that you have random items lying around in the yard. While I was home, I ran into a pile of pallets. I had Banner help me pull all the nails out (they are full of nails). I then cut one of the lengths in half, and placed it on the back of all of them. My Dad helped me find a few screws that would hold it together, and not go through all of the wood. I put it all together a few months ago, and it has been sitting in the trunk of my car for several weeks. I couldn't decide on the prefect project. Then I woke up this morning, and had an idea of what I wanted. 
 My project started today, with me tightening the screw that were holding it all together. They had gotten a little loose while it had been in my trunk.
 I decided that I wanted to paint it freehand. I had decided on the saying a long time ago. The lyrics are from, My Shepard Will Supply My Need. The pallet now measures 39x21 inches. It is just big enough for a wall in my family room.


I like the results. Its a wonderful example of pallet art. 

Flowers for Every Season

 I wanted to make a wreath for Miranda for Christmas. I bought a small Styrofoam wreath form from Michaels Crafts. I wrapped it in thick cream yarn. Why? My plan was to make flowers that were removable, so it could be a new wreath every season. Cream matches everything, right? 
 Plan on spending quite a bit of time wrapping. It took me quite a while, because I was concentrating on making it perfect. 
 Now, to make the flowers. I took a full sheet of felt and cut them into two inch strips. You can then use a hot glue gun and fold the strip in half and glue it together. 
 Depending on the size of flower that you are trying to make, you may need a few strips. I suggest making them all at once. 
 Take you scissors and make small cuts all along the bent edge of the felt. Don't cut all the way through. 
 Start at one end and roll. Keep rolling, I like mine tight, so I keep everything really close together. 

 Glue then end, and you have one small flower. 
If you want bigger, add the next strip where you left off. Glue it in place, and then continue rolling.
 Add as many strips as you want until you are satisfied with the size of your flower. 


To make them removable, I glued a piece of matching fabric to the flower, and then glued a hair clip. Best part about the hair clip on the back, besides that you can take them on and off your wreath, you can use them in your hair, clothes, etc...

When I get pictures back from Miranda, I will post the final results. Stay tuned.